[Spring] 예외 처리
본 포스트는 Inflearn의 김영한님 강의를 바탕으로 작성했습니다.
Exception Handle
스프링 부트는 기본 설정으로 예외가 WAS에 전달되거나 Response.sendError() 가 호출되면 /error 를 호출한다. 그러면 BasicErrorController 가 제공하는 기본 정보들을 활용해서 오류 API를 생성해준다. 하지만 API 마다, 각각의 컨트롤러나 예외마다 서로 다른 응답 결과를 출력해야 할 수 있다. 때문에 API 오류 처리는 @ExceptionHandler 를 사용하는 것이 좋다.
ExceptionResolver

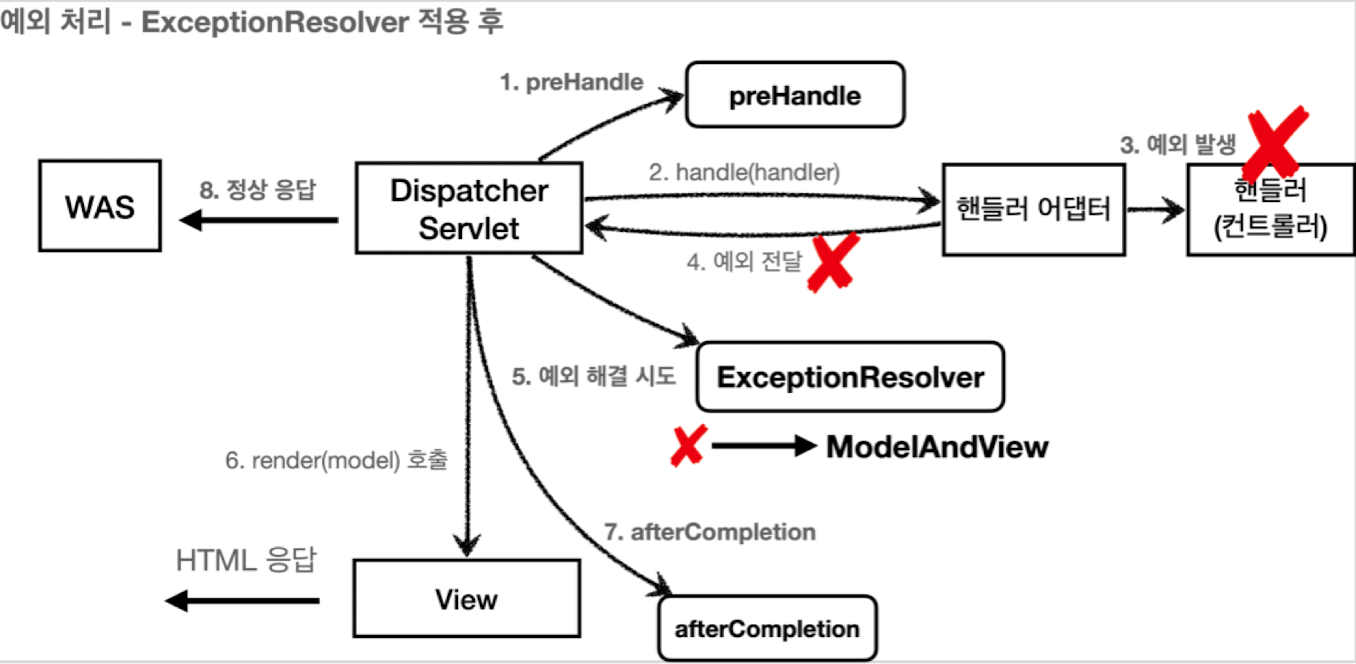
ExceptionResolver 가 없다면 예외가 발생하면 Controller -> Interceptor -> Servlet -> Filter -> WAS 까지 올라간다.
그런데 예외를 처리할 수 있는 ExceptionResolver 가 있으면 서블릿 컨테이너(WAS) 까지 예외가 전달되지 않고 MVC 선에서 예외 처리가 끝난다.
가장 우선순위가 높은 ExceptionResolver 는 HandlerExceptionResolver 이다. @ExceptionHandler를 처리하는 ExceptionResolver이며 거의 이것만 쓴다고 생각하면 된다.
@ExceptionHandler
@ExceptionHandler 애노테이션을 붙여주고, 해당 컨트롤러에서 처리하고 싶은 예외를 지정해주면 예외가 발생했을 때 이 메서드가 호출된다. 지정한 예외 뿐 아니라 예외의 자식 클래스까지 모두 처리할 수 있다.
예시코드
@RestController
public class ApiController {
  @ExceptionHandler
  public ResponseEntity<Obj> handleEx(IllegalArgumentException e) {
    return new ErrorResult("BAD_REQUEST", e.getMessage());
  }
}
우선순위
구체적인 것이 더 높은 우선순위를 가진다. 부모예외처리 와 자식예외처리 가 있으면 자식예외처리 가 호출된다.
@ControllerAdvice
예외처리를 컨트롤러에 다 집어넣으면 가독성이 떨어지고 지저분한다. @ConrollerAdivce, @RestControllerAdvice 를 사용하면 정상 코드와 예외 코드를 분리할 수 있다.
예시코드
//@ControllerAdvice + @ResponseBody
@RestControllerAdvice
public class MyControllerAdvice {
 	@ExceptionHandler
  public ResponseEntity<ErrorResult> handlerEx(Exception e) {
    ErrorResult errorResult = new ErrorResult("ex", e.getMessage());
    return new ResponseEntity<>(errorResult, HttpStatus.BAD_REQUEST);
  }
}
동작범위 설정
@ControllerAdvice
public class Advice0 {}

@ControllerAdvice(annotations = RestController.class)
public class Advice1 {}

@ControllerAdvice("org.com.controllers")
public class Advice2 {}

@ControllerAdvice(assignableTypes = {ControllerInterface.class, AbstractController.class})
public class Advice3 {}
- 기본적으로 범위를 설정하지 않으면 전역으로 동작하게 된다.
- 특정 애노테이션이 있는 컨트롤러를 지정할 수 있다.
- 특정 패키지를 직접 지정할 수도 있다.
- 특정 컨트롤러를 지정할 수 있다.
출처
- https://www.inflearn.com/course/%EC%8A%A4%ED%94%84%EB%A7%81-mvc-1